|
Beginner's Corner

Welcome to Barbecue'n On The Internet's "Beginner Pages!" If you have proceeded in order, then you should have a pretty good understanding of outdoor cooking. We will now turn our attention to the "Fine Art of Barbecuing". We suggest each beginner get the grilling aspects down pat before proceeding to barbecuing. If you feel a need to go back and review some of the previous pages, go ahead . . . . we'll wait right here for you to return . . . . . .

Now we are into the section is where "Type B" folks, who like to congregate for a much longer time, leisurely visit with friends and neighbors around the pit while sipping their favorite beverages and exchanging lies which wouldn't be remembered in the morning . . . . . Does the relaxing, talking and partaking of refreshments lead to barbecuing . . . . . or does barbecuing lead to the relaxing, talking and partaking of refreshments? Doesn't matter, it all adds up to some real enjoyable times.
Ah yes, the fine art of barbecuing. That time when the world slows down, grass quits growing and the kids are somewhere else enjoying themselves. A time when neighbors come over and old fashion talking is reinvented.
I guess we could continue to linger, but if we did, barbecuing would not get started and that would be a real shame. So here we go . . . . . .

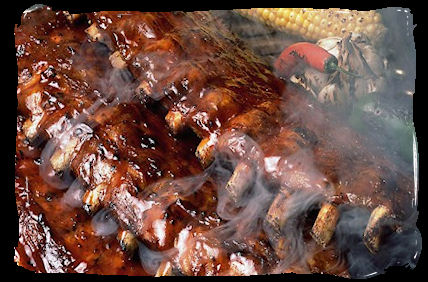
There are probably as many different types of barbecue pits out there as there are inventive minds. Buried luau pits, deep hole pits, cinder block pits, brick pits, offset barbecue pits and covered grills are only a few. Let it suffice to say that there are various types of equipment that may be used, but the CONSTANT in barbecuing is slow cooking with wood coals/charcoal at 210 to 225 degree temperatures for longer periods of time. "Longer periods of time" are generally 6 to 24 hours of cooking time depending upon the food being prepared.
The three most common pits used for barbecuing are steel barbecue pits, [sometimes referred to as "offset smokers"], brick pits and barrel pits. Briefly, the offset smoker utilizes a horizontal steel cylinder with a chimney on one end and a fire box on the other. Heat is generated in a separate area - away from the food and is evenly delivered to the food and allowed to leave at the other end via the chimney. This is slow cooking at its finest. These pits generally cost from $250 to $900 with the average being $500 to $600 for a good quality pit. They can also be expected to last 20 years or more with proper care and maintenance.
Brick pits work similarly. Heat is placed at one end and the meat is at the other. The chimney is at the end opposite the heat source. Brick pits, while pretty, quite often are built in the wrong place and require much larger amounts of fuel [charcoal] to keep at the proper temperature. They ARE pretty, however! These pits generally cost from $1500 to $??? - depending upon size and your talents. If you do the work yourself, AND WE DO CALL IT WORK, the costs can be more reasonable. On the other hand if you want someone else to do the work, dig down deep in the 'ole wallet and be ready to pay the piper. Depending upon the quality of construction, they can expected to last 10 to 20 years plus, again with proper care and maintenance. An additional concern we have with brick is that they will crack and break and become less attractive.
barrel pits are a "staple" of the back yard barbecuer. You have all seen them before. They are the typical 55 gallon drum, usually horizontal and hinged on the side for easy access. Folks have been using this method probably longer than any other. The only thing that has changed in recent years is that most are now constructed out of new materials and not old used chemical barrels that could be hazardous to one's health!
We are going to add one additional type of pit because one, they can be adapted to perform as barbecue pits and two they are priced where most folks can utilize them. What we are talking about is the "covered grill" being adapted as barbecue pits. All that is really required is to insure the heat is not directly under the meat and the temperature is maintained for the length of the cooking. The way we do this is to place bricks or other non-burnable substance below the grates to keep the heat from becoming in direct contact to the meat.
Lighting the Charcoal, Obtaining Coals and Getting Started are just about the same as with grilling, with one exception. Take the necessary time to get the heat stabilized at 210 to 225 degrees. This is the range were the cooking will be done. It make take a few times before mastering the task, but rest assured proficiency will prevail.
When the temperature has been stabilized, it is time to put the meat in the cooking chamber. Generally, the preferred location for the meat is in the center of the away from the heat. What that means is to place the meat in the center of the cooking chamber of the smokers and the opposite end from the heat source in the brick, barrel and covered grills pits.
Remember, when barbecuing, we are seeking a sustained cooking time for thicker portions of meat. In order to accomplish this, we need to insure several things are accomplished on regular basis. First, we need to keep the heat at the preferred temperature of 210 to 225 degrees in the area of the meat. Secondly, we need to baste the meat occasionally to keep it moist and keep it from becoming overly bitter with too much smoke. And thirdly, we need to have plenty of our favorite beverages nearby in order that we can perform the first two tasks efficiently.
Maintaining the proper temperature involves adding additional charcoal or wood coals [very, very little raw wood may be added for more flavor] to the existing heat. If the fire becomes cooler, then add additional fuel. If it become too hot ---> AND THIS IS IMPORTANT <--- close the AIR vent to the fire. NEVER close the EXHAUST vent or chimney cover! If you do it wrong, it will cause the meat to become more bitter and sooty than desirable. Repeat, always adjust the temperature with the intake air vents.
Basting meat requires periodic applying non-burning [not the same as non-flammable] liquids to the surface of the meat to keep it moist and flavorful. This basting sauce is frequently called a "mop" because it is moped on the meat every 15 to 30 minutes. What this mop can look like would be a solution of fresh liquids such as beer, vinegar, chicken stock, lemon juice and others mixed with favorite spices and vegetables such as chopped onions, garlic, carrots along with pepper, salt, paprika, worcestershire sauce, butter, canola, thyme, basil or other ingredients to taste.
Pay special attention that we did not include any products which contained tomatoes or sugar. Both of these have low burn temperatures and as such, will burn on the meat and taste burned. Not a real pleasant thought! So, don't use them!
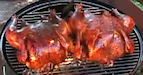
OK, now we have the heat constant and we know how to keep the meat moist and flavorful . . . . what are we going to cook? Some of the ideal selections for beginning would be whole chickens, baby back ribs, sausage, cornish hens and perhaps even a small brisket! Each one, we will discuss briefly.
The one "tool" which is necessary for barbecuing is a bi-therm instant read meat thermometer. I repeat, it is a must tool. The temperature of the fire and outdoors varies so much that the only way to insure when the meat is done is checking the internal temperature of the meat - - - it never lies! They cost about $10 to $15 and will insure you don't go to the doctors office experiencing gastrointestinal problems or to the dentist with broken teeth! Get one, it will save its weight in bad food many times over!
ADD HERE THE DIFFERENT WAYS TO BARBECUE SOME OF THE BASICS.
Now, get to cookin' . . . . . . .
Basic Outdoor Cooking Lessons - Go here first!
Back to the Beginner's Page
Gas Grilling
Wood & Charcoal Grilling
|