Previously we have given you some tips on a way to keep the meat from
being directly beneath the fire thus allowing for slower cooking and more
smoke flavor. Now let's cook something.
Trot on down the grocery store and purchase some chicken halves. They will,
depending upon the butcher's cut, normally not include the back bone.
Prepare the grill in the manner we mentioned last month with the bricks down
the middle - fire on one side and a place for the chicken on the other. If
you are using a gas grill, light only one burner and use the other side for
the meat. Next, prepare Smoky's Basting Sauce which can be found at:
http://www.barbecuen.com/basting.htm
While you are on the site, go ahead and print out the cooking temperatures
chart provided at: http://www.barbecuen.com/temp.htm
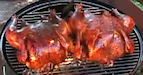
Following the directions provided with the basting sauce, and leaving the
skin on, place the chicken on the grill opposite the fire side. Cover and
maintain the temperature at about 225 degrees throughout the cooking period.
Plug any exhaust holes on the fire side of your grill, thus forcing the heat
to filter past the meat. Using a basting mop or brush or other item, baste
the chicken about every 15 to 30 minutes until done. In order to tell when
the chicken is done - not raw and not a crispy critter, use an instant read
meat thermometer.
The thermometer will serve you two purposes:
1. The thermometer, when inserted into the heat exhaust of the grill will
tell you the approximate temperature that you are cooking. The thermometer
will indicate about 10 degrees less than the cooking area.
2. When about 2/3rds done, start using the thermometer and insert it into
the thickest part of the meat. The chicken will be done when it has reached
160 degrees.
You may say why use a thermometer, it's for sissies - The answer is simple.
It will improve your results 1000% when smoke-cooking or grilling. It's
simple and easy and will guarantee outdoor cooking results. It will quickly
tell you the meat's internal temperature. Taylor makes a good one. A
thermometer is harder to use on thin hamburgers and chicken breasts,
however. Most good outdoor chefs will cook the meat according to internal
temperature of the meat, instead of a certain amount of time. Treasure this
technique - it's a solid one.