Championship BBQing Techniques
Pork Ribs
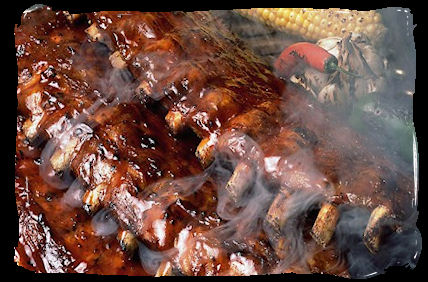
Our first topic deals with the selection, preparation, barbecuing, testing and presentation of some might fine Barbecued Pork Ribs! In each section (selection, preparation, etc.) we will explain how the professionals move through the process to create award winning entries for the judges to select from. We have provided a thumbnail of each photo in the text of the this document. To see the full picture, simply 'click' the image and take a detailed look at the full size photo.
Selecting the right type of pork rib is crucial. There are many types to choose from and each has it's special characteristics. Some of the more popular ones are the Baby Back Ribs, Spare Ribs and St. Louis Cut Spare Ribs. Each team has their preferences. Our's are the St. Louis Cut. What makes the St. Louis Cut Ribs is . . . . .
Once having selected the perfect 'rack of ribs', it is now time to prepare them for the pit. Preparation consists of trimming, membrane removal, application of the secret coating, rubbing and resting of the ribs prior to cooking. Trimming is important to the outcome of many pieces of meat. First is the removal
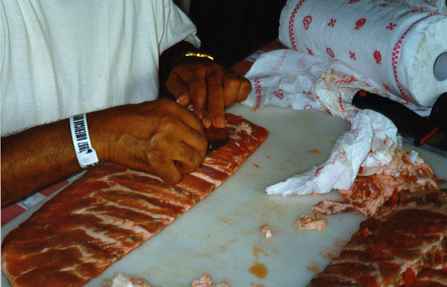
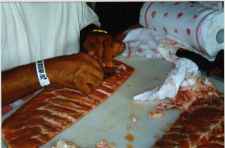
of the membrane located on the inside of each rack of ribs. This membrane is a tough translucent 'skin' located on the 'inside curve' of the ribs. It needs to be removed for flavor to penetrate the back side of the meat and to make eating more pleasurable. To remove the membrane, take a strong blunt instrument [ a Phillips head screwdriver makes an excellent tool] and begin the separation process. Once you can get your fingers/thumb between the membrane and meat, you can then dispense with the tool and begin to pry the two apart. Using some paper towels or napkins can reduce the effects of slipping.
Next, is the trimming of the extraneous fat from the ribs. This can be a relaxing process accompanied by your favorite beverage, or a tense, uptight procedure based upon getting the food on the table. We prefer the first. If the latter is your objective, then .................. come back when you have the time to enjoy yourself!
Using a small paring knife, carefully remove all extraneous pieces of fat, leaving the natural fat located
"between the ribs". Remember, we are not attempting to remove all the fat, because much of it will be necessary for creating moist ribs by self basting during the cooking process. What we are looking to accomplish is to remove the 'larger' pieces that lie on the outside of the meat - - - not inside the ribs!
Once the ribs have been cleaned, it is now time to season them up. But before applying the rub you plan on using, many championship rib master will apply a light to medium coating of standard yellow French's mustard. YES, mustard. This does several things for the ribs. First, it helps keep them moist. Second, it helps to hold the rub on the meat. Third, over a 4 to 6 hour period, it develops a nice tender crust on the ribs. And lastly, you cannot taste the mustard after that length of cooking time.
Now to apply the rub. Here is where you need to experiment. Everyone has their own taste buds and therefore seasoning is a preference type of thing. There are many rib rubs on the market and we suggest you trying them all until you find one to your liking. If you are the experimental natured person, then we suggest you work on combination of mixes and find out which one has that special taste you are seeking. Common ingredients of rib rubs consist of: salt, sugar, brown sugar, turbinado sugar, onion powder, garlic powder, paprika, hungarian paprika, peppers of all types, chili powder, and many, many more.
After the ribs have been rubbed, allow the meat to rest and absorb the seasonings. You may wrap the ribs in foil or plastic and place them in the cooler or refrigerator for several hours. If you want to break the process into two parts, then trim and season the ribs one evening and cook them the next! It makes for great entertainment and less rushing about if you are a late sleeper or want to eat early!
Now, it's time to cook . . . . .
Ribs do not need the long intense cooking times as do briskets, shoulders and whole hogs. With temperatures in the range of 200 degrees to 220 degrees, the task may be completed in as little as 4 to 6 hours. That provides plenty of time to enjoy your favorite beverage, talk barbecue and enjoy friends and the relatives of choice.
The actual barbecuing of the ribs can take several forms. It helps to have a larger cooking surface where you can lay the ribs down (curve up like ^ this) with the ends touching the surface instead of the rib meat. This allows for even cooking temperatures on all surface of the ribs. Notice these ribs are being cooked in a "vertical" fashion. If you are cooking on a smaller unit - even a Weber(tm) Kettle or Kingsford(tm) Grill, then we suggest purchasing a rib rack.
This is a metal unit that holds the ribs upright like books in a bookshelf, but prevents them from touching. The disadvantage of using a smaller unit is that there will be more heat on the outside ribs than the ones in the middle of the rib rack. (We are assuming, of course, you are cooking more than one rack of ribs!)
Beneath the ribs lies a pan of water to trap juices, help maintain the heat level around 220 degrees and provide some moisture to the cooking chamber. Never cook any meat being barbecued over the direct heat source. Always use indirect heat! In this example, using a smaller grill to cook the ribs, hardwood charcoal is then burned on either site of the pan providing "offset" heat - - - as opposed to "direct heat" (i.e. grilling). You may also use charcoal briquettes. Since briquettes contain more fillers that hold the briquettes together, more frequent removal of ash will be required. When using the rib racks on the smaller units, ribs are rotated
and turned during the process for even cooking. If you have the luxury of a larger offset smoker, then you should have plenty of room to place the ribs without worry of drying out or over cooking. We do, however, suggest rotating them also to even out the heat and time the ribs are cooked.
As we approach the final stages of our championship ribs, we have allowed the temperature in the pit to drop to about 175 or 180 degrees. We have about 15 to 20 minutes left. Time to locate the finishing sauce - - - many folks refer to this as barbecue sauce.
About 20 minutes or so and before the ribs are completed and ready to present to the judges,most contestants will apply a finishing sauce to the ribs and return them to the grill after the heat begins to subside. Many times this finishing sauce is made from a tomato base with sweeteners. If the sauce was applied any earlier, it would burn, thus creating a blackened rib with a bitter, burnt taste.
Getting closer . . . . .
For any good presentation, not to mention good eating, we need to be able to slice the ribs in a fashion that presents clean, clear cuts that do not mar or tear the meat. Be sure that your knife is really sharp! Take the time necessary to sharpen it and test the sharpness on either other meats or a piece of paper.
Notice how, when the ribs are about to be sliced, they are "stood up on end". This allows for smooth and clean cutting while at the same time avoiding "cutting into the bone" and/or marring the finish of the meat prior to judging. When they are standing up, it is easier to see where the bone is. The bone is obviously to be avoided when cutting.
Judging time . . . . .
With so many ribs to choose from (usually there are 4 to 10 racks of ribs cooked at a time), the choice of which ones to submit can be both tasty and difficult. The competitive team has several (4 to 5) tasters who carefully rates a couple of the ribs and then selects the best rack. The remaining ribs from the rack are then carefully sliced and set aside for presentation. Only the "finest of the fine" are selected. Please keep in mind that their "throw aways" are better than you can find in the best rib houses!
On to the presentation . . . . .
In presenting the ribs entry for judging, each contestant is furnished with a container with a number on it. The number relates to the team for scoring purposes. It also hides the name of the entrant from the judges.
Scoring is on presentation, tenderness and taste.
All containers are the same size and shape. The presentation allows for using green lettuce only. No tomatoes or any other type of garnish is allowed. The ribs may be prepared in the arrangement of your choice. Final touches are performed and then a "runner" is sent to the judging tent with the entry! Don't trip!
As you can see from the photos, these were some mighty fine tasting ribs!
|